Azure Course Labs
Building Custom VM Images
You can include app deployment with a script when your VMs are created, but there’s a downside to that - you add to the deployment time every time you create a new VM. An alternative is to create your own VM image from a VM which has the app already deployed. Then any time you create a new VM it will have the app installed as soon as it comes online.
In this lab we’ll create a VM, deploy an application and then create an image from that VM which we can use to create other VMs.
Reference
Create a Base VM
You create an image from a VM - so first you need to prepare the VM with the app deployed.
We’ll be deploying a simple Windows application that runs on the IIS Web Server.
📋 Create a Resource Group called labs-vm-image and create a Windows Server 2022 Datacenter VM.
Not sure how?</summary>
Create the RG in your preferred location:
az group create -n labs-vm-image --tags courselabs=azure --location westeurope
Find the SKU for Windows:
az vm image list-skus -l westus -p MicrosoftWindowsServer -f WindowsServer -o table
Now create the VM with your chosen size, location and SKU:
az vm create -l westeurope -g labs-vm-image -n app01-base --image MicrosoftWindowsServer:WindowsServer:2022-datacenter-core-g2:latest --size Standard_D2s_v5 --admin-username labs --public-ip-address-dns-name <your-unique-dns-name> --admin-password <your-strong-password>
</details>
Connect to your VM with a Remote Desktop client, then you can install the application dependencies and the application itself.
You’ll get to a terminal session if you used Windows Server Core, or a GUI for the full Windows Server.
Use PowerShell to install the IIS Web Server:
Install-WindowsFeature Web-Server,NET-Framework-45-ASPNET,Web-Asp-Net45
Remove the default web page and download the application web page:
rm -fo C:\inetpub\wwwroot\iisstart.htm

curl -o C:/inetpub/wwwroot/default.aspx https://raw.githubusercontent.com/courselabs/azure/main/labs/vm-image/app/default.aspx
Test the app locally - you should see some simple HTML which includes the name of the VM:
curl.exe localhost
Prepare the VM for imaging
That’s it for this demo application, but when you build up your base VM you can configure whatever setup your application needs.
Now for a Windows VM you need to run the Sysprep tool which generalizes the VM to remove details specific to the machine.
Start the command:
C:\windows\system32\sysprep\sysprep.exe
Select:
- Enter System Out-of-Box Experience (OOBE)
- tick Generalize
- and choose Shutdown:
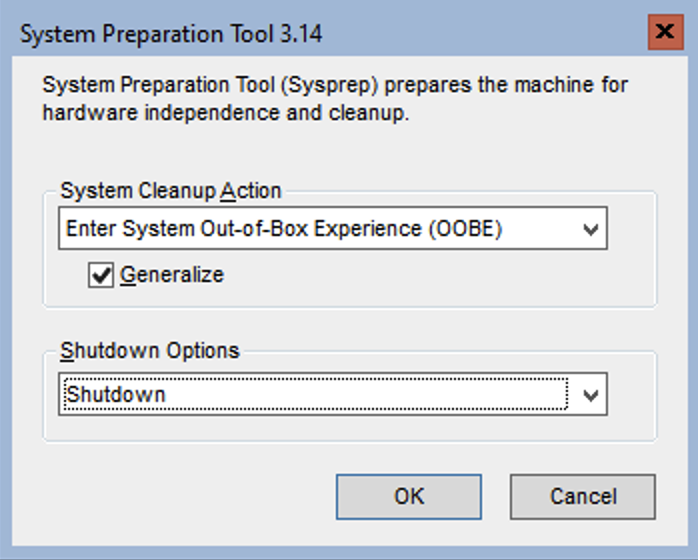
Hit OK and the VM will be generalized and then shut down - you’ll lose your Remote Desktop connection.
Next we need to get the VM ready for creating an image.
📋 Deallocate and generalize the machine using az vm commands.
Not sure how?</summary>
Deallocating the machine ensures that it is shut down from Azure’s perspective:
az vm deallocate -g labs-vm-image -n app01-base
We have already generalized the VM with Sysprep, but we need to mark it as generalized in Azure:
az vm generalize -g labs-vm-image -n app01-base
</details>
Print the details of the VM to confirm it is ready to use for an image:
az vm show --show-details -g labs-vm-image -n app01-base
The power state should be VM deallocated & no public IP
Now the VM is ready.
Create an image from the VM
Image creation is straightforward - you name the image you want to create and the VM you want to use.
# check the help text:
az image create --help

# if your base image was a generation 2 (gen2) SKU, you need to set that too:
az image create -g labs-vm-image -n app01-image --source app01-base --hyper-v-generation V2
This won’t take long - effectively the image is just a reference to the OS disk. Check your image is ready:
az image list -o table
When it completes, check the VM image in the portal - you have options to create a VM or clone to a new image.
You often want to keep your images in a separate Resource Group, because they have a different lifecyle and you want to retain them if you delete an application RG.
📋 Create a new RG called labs-vmss-win in the same location as your lab RG and use an az image command to copy your image to that RG.
Not sure how?</summary>
This is just an ordinary RG:
az group create -n labs-vmss-win --location westeurope
The copy command takes source and target parameters:
az image copy --help

az image copy --source-type image --source-resource-group labs-vm-image --source-object-name app01-image  --target-location westeurope --target-resource-group labs-vmss-win
</details>
Copying an image can take a while - Azure takes a snapshot of the OS disk and copies it to a temporary storage account. It will start slowly - 1%… 2%… 3% - then suddenly speed up.
You don’t need to wait for this part to complete - open a new terminal window and carry on.
BUT if you see an error from the CLI with KeyError: 'IMPORT_ENUM', this is a known issue. Switch to the Portal and move the VM image to the new RG instead, so we can use the image later.
You can use the normal vm create command, using your image name instead of a marketplace URN.
This will create 3 VMs from your base image:
az vm create -g labs-vm-image -n app-n --image app01-image --size Standard_D2s_v5 --admin-username labs --count 3 -l westeurope --admin-password <strong-password>
Try browsing to the app on one of your VMs, using its public IP address.
Lab
You can’t access the app because the NSG blocks traffic. Add a new rule to allow port 80 and confirm you can reach each of the VMs - you’ll see the same page from each, but with a different VM name displayed. These are three instances of the same application, it would be good to have a single DNS address and let Azure load-balance betweeen them. Create a Traffic Manager Profile resource in the Portal and configure it to do that.
Cleanup
Delete the lab RG but don’t delete the labs-vmss-win RG where you copied the image (we’ll use that in the next lab):
az group delete -y -n labs-vm-image
az group create -n labs-vm-image --tags courselabs=azure --location westeurope
az vm image list-skus -l westus -p MicrosoftWindowsServer -f WindowsServer -o table
az vm create -l westeurope -g labs-vm-image -n app01-base --image MicrosoftWindowsServer:WindowsServer:2022-datacenter-core-g2:latest --size Standard_D2s_v5 --admin-username labs --public-ip-address-dns-name <your-unique-dns-name> --admin-password <your-strong-password>
Install-WindowsFeature Web-Server,NET-Framework-45-ASPNET,Web-Asp-Net45
rm -fo C:\inetpub\wwwroot\iisstart.htm
curl -o C:/inetpub/wwwroot/default.aspx https://raw.githubusercontent.com/courselabs/azure/main/labs/vm-image/app/default.aspx
curl.exe localhost
C:\windows\system32\sysprep\sysprep.exe
Hit OK and the VM will be generalized and then shut down - you’ll lose your Remote Desktop connection.
az vm commands.
Not sure how?</summary>
Deallocating the machine ensures that it is shut down from Azure’s perspective:
az vm deallocate -g labs-vm-image -n app01-base
We have already generalized the VM with Sysprep, but we need to mark it as generalized in Azure:
az vm generalize -g labs-vm-image -n app01-base
</details>
Print the details of the VM to confirm it is ready to use for an image:
az vm show --show-details -g labs-vm-image -n app01-base
The power state should be VM deallocated & no public IP
Now the VM is ready.
Create an image from the VM
Image creation is straightforward - you name the image you want to create and the VM you want to use.
# check the help text:
az image create --help
# if your base image was a generation 2 (gen2) SKU, you need to set that too:
az image create -g labs-vm-image -n app01-image --source app01-base --hyper-v-generation V2
This won’t take long - effectively the image is just a reference to the OS disk. Check your image is ready:
az image list -o table
When it completes, check the VM image in the portal - you have options to create a VM or clone to a new image.
You often want to keep your images in a separate Resource Group, because they have a different lifecyle and you want to retain them if you delete an application RG.
📋 Create a new RG called labs-vmss-win in the same location as your lab RG and use an az image command to copy your image to that RG.
Not sure how?</summary>
This is just an ordinary RG:
az group create -n labs-vmss-win --location westeurope
The copy command takes source and target parameters:
az image copy --help
az image copy --source-type image --source-resource-group labs-vm-image --source-object-name app01-image --target-location westeurope --target-resource-group labs-vmss-win
</details>
Copying an image can take a while - Azure takes a snapshot of the OS disk and copies it to a temporary storage account. It will start slowly - 1%… 2%… 3% - then suddenly speed up.
You don’t need to wait for this part to complete - open a new terminal window and carry on.
BUT if you see an error from the CLI with KeyError: 'IMPORT_ENUM', this is a known issue. Switch to the Portal and move the VM image to the new RG instead, so we can use the image later.
You can use the normal vm create command, using your image name instead of a marketplace URN.
This will create 3 VMs from your base image:
az vm create -g labs-vm-image -n app-n --image app01-image --size Standard_D2s_v5 --admin-username labs --count 3 -l westeurope --admin-password <strong-password>
Try browsing to the app on one of your VMs, using its public IP address.
Lab
You can’t access the app because the NSG blocks traffic. Add a new rule to allow port 80 and confirm you can reach each of the VMs - you’ll see the same page from each, but with a different VM name displayed. These are three instances of the same application, it would be good to have a single DNS address and let Azure load-balance betweeen them. Create a Traffic Manager Profile resource in the Portal and configure it to do that.
Cleanup
Delete the lab RG but don’t delete the labs-vmss-win RG where you copied the image (we’ll use that in the next lab):
az group delete -y -n labs-vm-image
az vm deallocate -g labs-vm-image -n app01-base
az vm generalize -g labs-vm-image -n app01-base
az vm show --show-details -g labs-vm-image -n app01-base
The power state should be VM deallocated & no public IP
# check the help text:
az image create --help
# if your base image was a generation 2 (gen2) SKU, you need to set that too:
az image create -g labs-vm-image -n app01-image --source app01-base --hyper-v-generation V2
az image list -o table
When it completes, check the VM image in the portal - you have options to create a VM or clone to a new image.
labs-vmss-win in the same location as your lab RG and use an az image command to copy your image to that RG.
Not sure how?</summary>
This is just an ordinary RG:
az group create -n labs-vmss-win --location westeurope
The copy command takes source and target parameters:
az image copy --help
az image copy --source-type image --source-resource-group labs-vm-image --source-object-name app01-image --target-location westeurope --target-resource-group labs-vmss-win
</details>
Copying an image can take a while - Azure takes a snapshot of the OS disk and copies it to a temporary storage account. It will start slowly - 1%… 2%… 3% - then suddenly speed up.
You don’t need to wait for this part to complete - open a new terminal window and carry on.
BUT if you see an error from the CLI with KeyError: 'IMPORT_ENUM', this is a known issue. Switch to the Portal and move the VM image to the new RG instead, so we can use the image later.
You can use the normal vm create command, using your image name instead of a marketplace URN.
This will create 3 VMs from your base image:
az vm create -g labs-vm-image -n app-n --image app01-image --size Standard_D2s_v5 --admin-username labs --count 3 -l westeurope --admin-password <strong-password>
Try browsing to the app on one of your VMs, using its public IP address.
Lab
You can’t access the app because the NSG blocks traffic. Add a new rule to allow port 80 and confirm you can reach each of the VMs - you’ll see the same page from each, but with a different VM name displayed. These are three instances of the same application, it would be good to have a single DNS address and let Azure load-balance betweeen them. Create a Traffic Manager Profile resource in the Portal and configure it to do that.
Cleanup
Delete the lab RG but don’t delete the labs-vmss-win RG where you copied the image (we’ll use that in the next lab):
az group delete -y -n labs-vm-image
az group create -n labs-vmss-win --location westeurope
az image copy --help
az image copy --source-type image --source-resource-group labs-vm-image --source-object-name app01-image --target-location westeurope --target-resource-group labs-vmss-win
You don’t need to wait for this part to complete - open a new terminal window and carry on.
BUT if you see an error from the CLI with KeyError: 'IMPORT_ENUM', this is a known issue. Switch to the Portal and move the VM image to the new RG instead, so we can use the image later.
vm create command, using your image name instead of a marketplace URN.az vm create -g labs-vm-image -n app-n --image app01-image --size Standard_D2s_v5 --admin-username labs --count 3 -l westeurope --admin-password <strong-password>
az group delete -y -n labs-vm-image